Overview
Rhythm supports Single Sign-On (SSO) via SAML as a Service Provider (SP) using an external Identity Provider (IdP) for user authentication. SAML (Security Assertion Markup Language) is an XML-based open standard for transferring identity data between two parties: an identity provider (IdP) and a service provider (SP).
Configuring SSO consists of the following steps:
- Request that SSO be enabled for your company.
- Set up Rhythm as an app or SP in your IdP.
- Enter information about your IdP into Rhythm.
- Set up your users in Rhythm.
Note: Single Sign-On is only available for customers who have this paid feature turned on. Please contact your RSM or our Support Team for more information.
SSO is a company-wide setting and will apply to all users in your account once it is set up.
Request SSO To Be Enabled
To request SSO to be enabled for your company, you may email help@rhythmsystems.com.
After SSO has been enabled for your company, you will see additional fields in the Company Admin -> Company screen in the Options section:
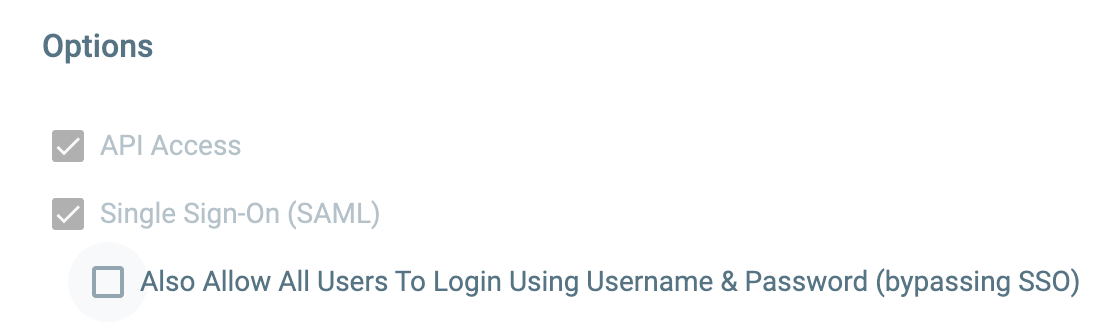
You may want current users who have a Username and Password to be able to continue using their existing credentials for a time. In those cases, the Rhythm Admin will need to check the box for "Also Allow All Users to Login Using Username & Password" in the Company Admin screen.
Turning on this setting will enable inviting users from outside your organization to set up and login to an account without going through the Single Sign-On IdP.
Set Up Rhythm As A Service Provider (SP) In Your Identity Provider (IdP)
Rhythm supports SSO via SAML only. Examples of IdP's supporting SAML include:
In your IdP, create Rhythm as a SP or a Custom SAML app. Follow the links above for specific documentation on how to do this in your IdD. Enter the following information for your company into the appropriate areas in your IdP:
- ACS (Assertion Consumer Service) URL
- Entity ID
- Single Logout URL (Optional) -- If your IdP does not support this, then ignore this field.
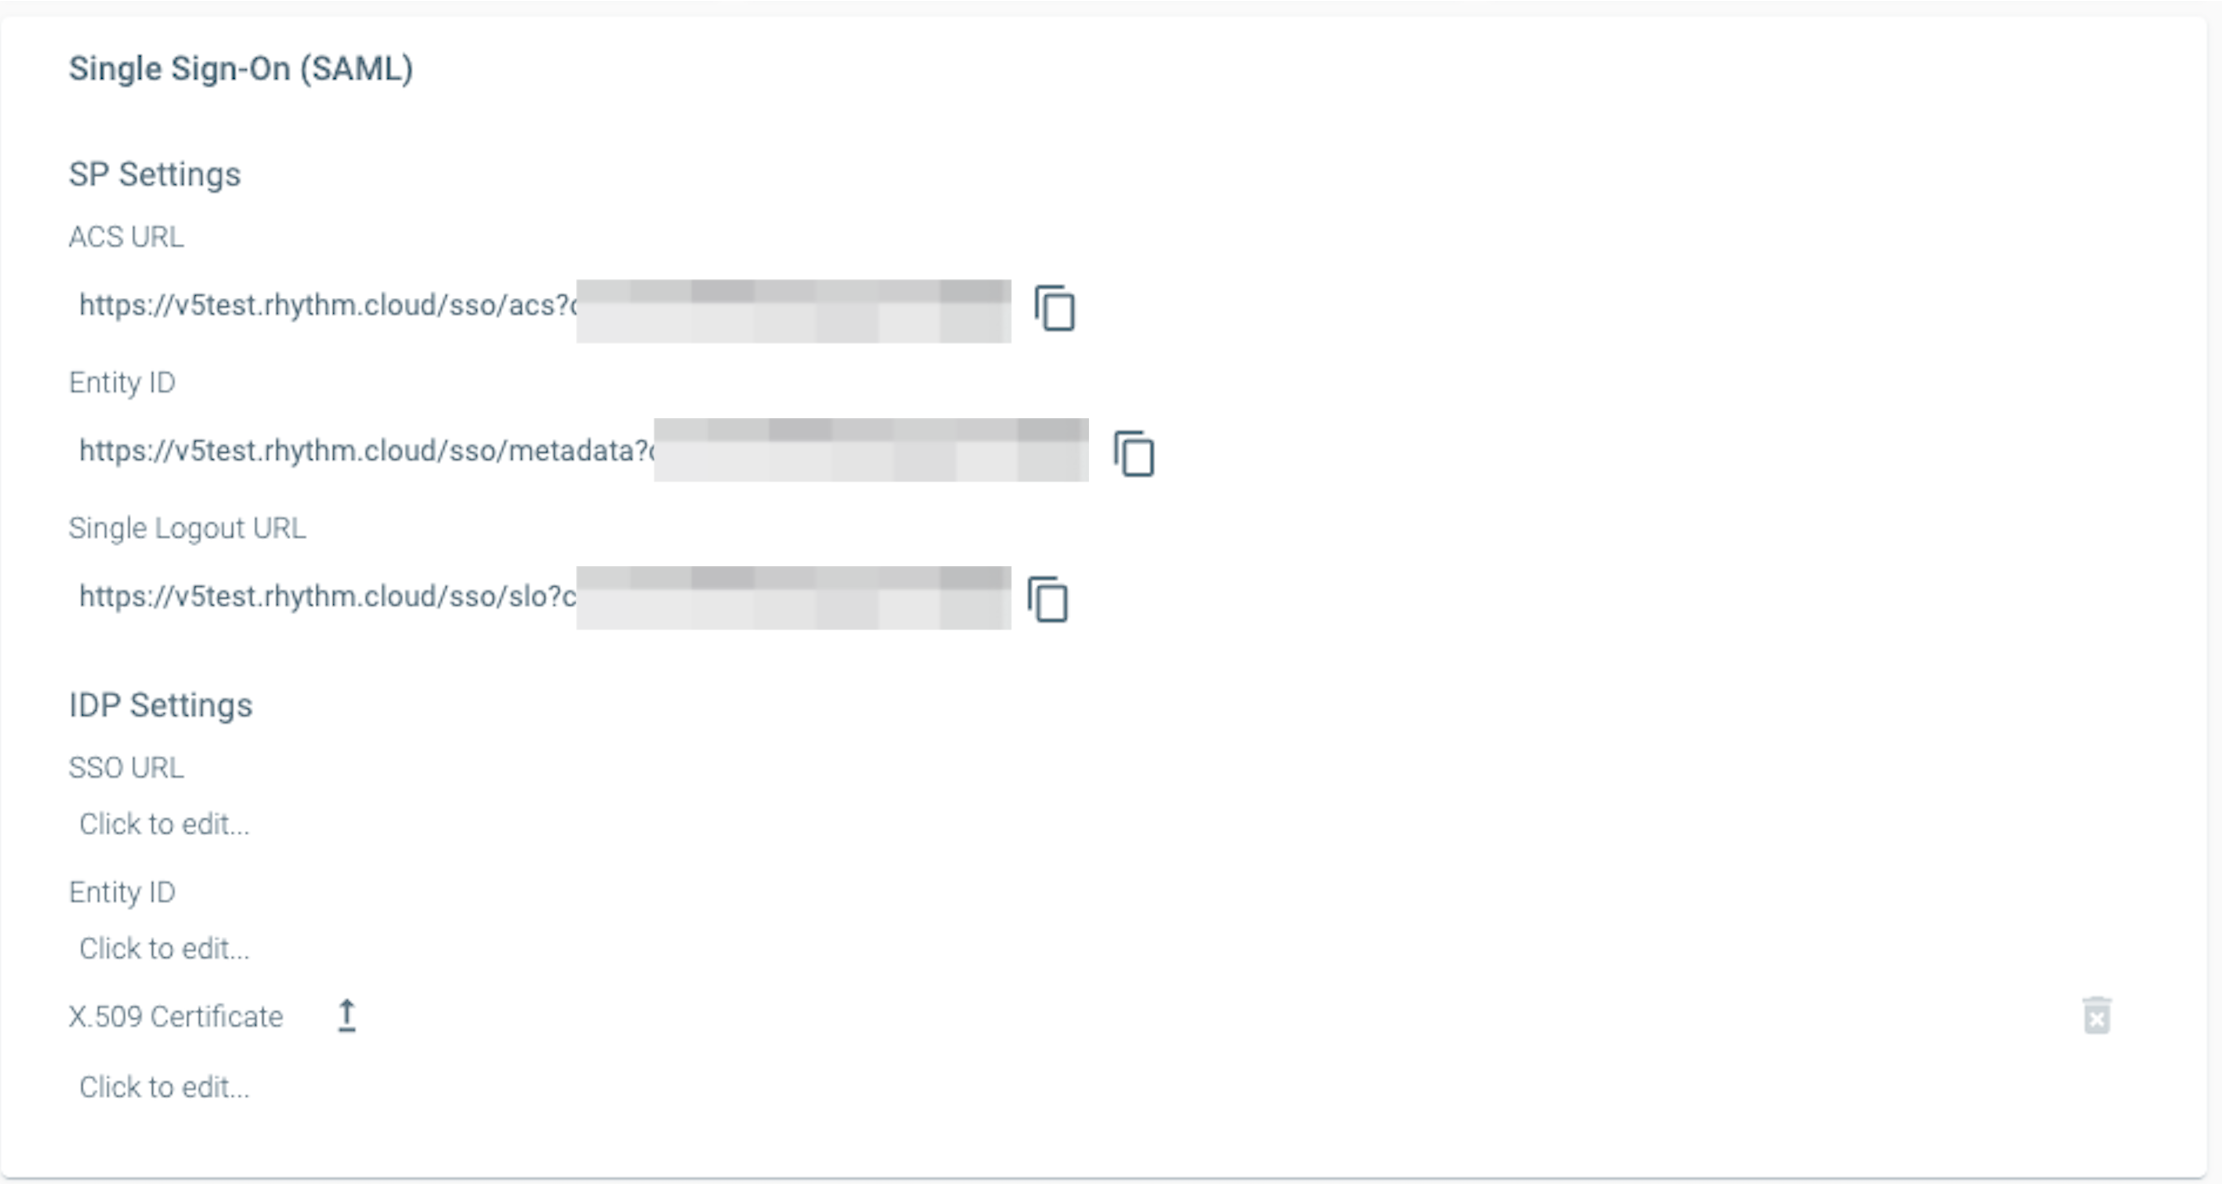
This info may be accessed from the Company Admin -> Company screen in the Single Sign-On (SAML) -> SP Settings section. We recommend using the copy button located next to each field to copy and paste the info to avoid any typographical errors.
Note: These fields are visible only if your company has been enabled for SSO; if you do not see these fields, please contact Rhythm Systems.
Note: If you are planning on using SP Initiated Authentication, then after SSO is set up for your company, your users should use the company specific URL provided in the "Rhythm URL for users" field on the Company Admin screen.
In addition, you must specify the field to use for the NameID in SAML. The NameID is the format of the username used for Rhythm, i.e. a valid email address. In cases where the IdP username is also an email address, then that's what should be used. In the situation where the IdP username is not an email address, then specify which user information field should be used as the NameID in SAML.
Your Identify Provider may ask for a logo file; you can access a Rhythm logo here.
Enter IdP Information into Rhythm
Rhythm requires the following information to handle SSO from an external IdP. These fields should be entered in the Company Admin -> Company screen in the Single Sign-On (SAML) -> IdP Settings section. We recommend using copy/paste functionality to avoid any typographical errors. The data for these fields can be found in your IdP:
- SSO URL
- Entity ID
- Single Logout (SLO) URL - this field is optional.
- Single Logout (SLO) Response URL (optional).
- X.509 certificate -- in pem format. We recommend using the file upload function to upload a valid .pem file downloaded from your IdP to avoid any typographical errors. Note that X.509 certificates have an expiration date. You must ensure that you upload a new certificate as the existing certificate's expiration date approaches to avoid any lapses in your company's users' ability to access Rhythm via SSO.
Adding New Users:
Once you've configured SSO for your company using the steps above, you will be able to add users to your account without having to complete the standard invite process.
Here are the steps:
- Go to Company Admin > Users
- Hit the + (Note that if you have "Also Allow All Users to Login Using Username & Password" checked, you will have the option to Add an SSO user, or Invite a non-SSO user, via the standard user invitation process.)
- Type in the users' email addresses, First, and Last Names (Note that the email must match exactly the NameID provided in the SAML)
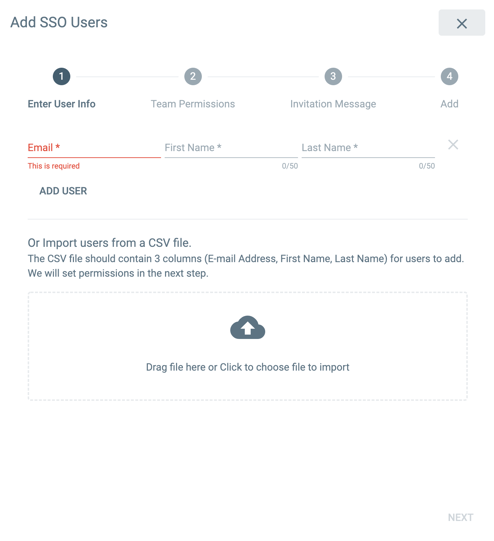
- You can add multiple users by clicking "Add User." If the users do not have the same team memberships and access permissions, you will have to add them separately.
- If you are adding a larger team with the same memberships and permissions, you can upload a CSV with 3 columns (E-mail Address, First Name, Last Name).
- Hit Next when you are done adding user information.
- Choose Team Memberships and access restrictions (Learn more here) and hit Next.
- You can edit the Invitation Message. We recommend editing the default message to indicate the users will need to go to your company's SSO page to access their Rhythm account. You can set a new default message for your company under Company Admin > Text Templates.
- Hit Next, review the steps if needed, and then click Add SSO Users.
- The added SSO users will not need to join or click through a verification process, their accounts are already verified and ready for them to access. Invited users will, however, be required to go through the normal invitation and acceptance process.
Important: The NameID to be supplied in the SAML must be a valid email address, and match the username in Rhythm exactly.
Important: Be aware that after SSO setup is complete, the Rhythm team will not be able to add new users to your account for you—unless they are non-SSO users (like external contractors). Please make future user addition requests to your internal IT team.
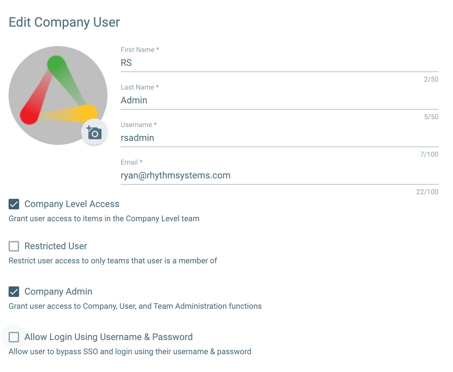
For some companies, you may work with contractors, board members, or others who do not have an email address within your Company's domain, or have access to your company's internal portal or IdP. In those cases, when you edit the user, you'll see an option to allow them to login with a Username and Password instead of using SSO.
Reach out to our Support Team if you have any questions about inviting non-SSO users to your account once SSO has been enabled for your company.